60 Days of Flutter : Day 3–4 : Building a Chat Screen in Flutter
In last part we finished setting up the CI. Today we’ll build the UI for the Conversation Screen.
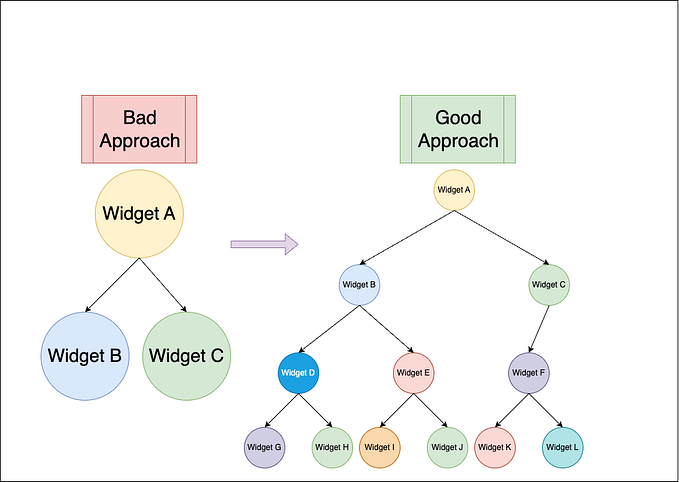
Gesture based navigation between chats was one of the primary features the app was supposed to have. We will be using a PageView which will help us achieve this functionality. If you’re familiar with flutter you might also be familiar with the tagline Everything in flutter is a widget.
This essentially means that we’ll have to think of our App and all of its segments in terms of widget. In the process we’ll be using some widget from the Flutter SDK and we’ll also be combining them to create our own custom widgets.
Before we start I’ll highly recommend going through this post by Julien Louage to have a better understanding of Rows and Columns and their MainAxis and CrossAxis Alignments in Flutter. Here’s a quick summary :
A Row is a widget used to display child widgets in a horizontal manner.
A Column is a widget used to display child widgets in a vertical manner.
- For a Row, X-Axis is the MainAxis and Y-Axis is the CrossAxis.
- For a Column, Y-Axis is the MainAxis and X-Axis is the CrossAxis.
Now let’s take a look at all the files/directories we’ll be creating today.

Config
The config contains :
- Assets : holds reference for all the assets.
- Palette : holds reference for all the colors we’ll use in the app.
You can see these files in the code changes section.
The Conversation Page
The conversation page will have three section, the app bar, the chat messages and the input section.
The App bar will have the Name, Username, Display Picture, Attach Button and the buttons for Photos,Videos & Files shared with the user.
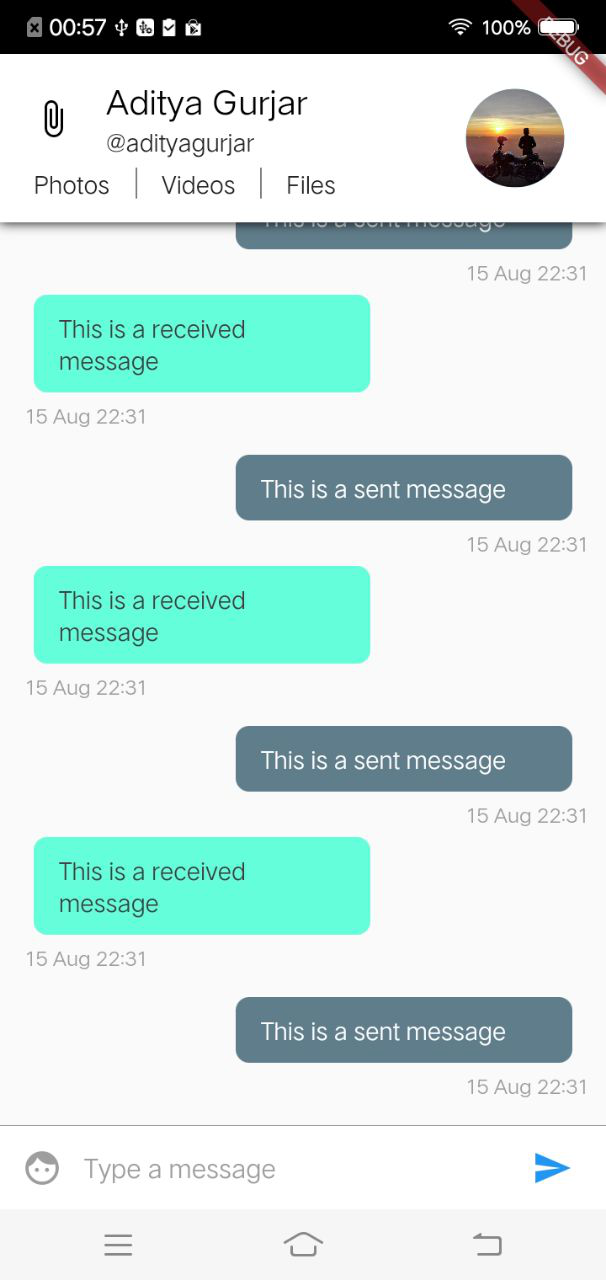
Here ChatListWidget, ChatAppBar, and InputWidget are three custom widgets which we’ll build in a while. We’re using the SafeArea Widget to avoid the status bar area of the device.

The Conversation Page List
We’ll use the PageView Widget to stitch together ConversationPage Widgets and navigate through them using gestures. For demonstration I’m adding three dummy instances of the Conversation Page.
The Custom Widgets
ChatAppBar
The ChatAppBar uses the decoration property of the Container widget to achieve a shadow effect. We then use Expanded widget’s flex property to split the container into two equal sections of 7:3 . The Display Picture here uses the CircleAvatar Widget and takes up 30% width of our Container. The rest of the app bar is formed using combination of container, Columns and rows.
ChatItemWidget
For the sake of creating this dummy we’re using even indexes for sent messages and odd indexes for received messages. We also have the timestamps for each of the messages. Notice how we’re using CrossAxisAlignement and MainAxis-Alignment to position the widgets.
ChatListWidget
ChatListWidget generates a listview . Note that we’ve used the property reverse=true so that all new messages can be added to the bottom of the display list. Here the itemBuilder takes as argument a widget which can take the index/data as argument and return the Widget for that position in the list.
InputWidget
The InputWidget contains the Emoji Button, the TextField and the Send button. Note that we have used the Widget Flexible to wrap both the content of InputWidget and ChatList. This is to make sure that both these widgets can expand to acquire the space in their parent widget.
And Finally
Here’s the end result.

Today we went ahead and created quite a few custom widgets. Also while merging the code Travis build failed with some tests failing. But I’m too tired to take a look at them today.

Tomorrow, We’ll take a look at why those tests failed and fix them. We will also write tests for all the code that we’ve written today. Catch you guys in the next one.
Code Changes
#3 Completed Conversation Screen UI
How Can You Contribute?
- Open issues with suggestion of better approaches or ideas for the app.
- Connect with me on Twitter or Linkedin or Instagram.
- Star the Github repository.
- Share the series on Twitter.
- Follow me on Github.
Posts In This Series
- 60 Days Of Flutter : Building a Messenger from Scratch
- 60 Days of Flutter : Day 1 : Creating the App
- 60 Days of Flutter : Day 2 : Setting Up A CI With Flutter
- 60 Days of Flutter : Day 3–4 : Building a Chat Screen in Flutter
- 60 Days of Flutter : Day 4–5 : Widget Testing With Flutter
- 60 Days of Flutter : Day 6–7 : Implementing a Slideable Widget Using Bottomsheet in Flutter
- 60 Days of Flutter : Day 8 : Changing The Launcher Icon and Implementing GestureDetector
- 60 Days of Flutter : Day 9–10–11 : Creating Awesome Register Screen in Flutter
- 60 Days of Flutter : Day 12–14 : Understanding BLoC Pattern in Flutter
- 60 Days of Flutter : Day 15–17 : Implementing Registration Screen using ‘flutter_bloc’
- 60 Days of Flutter : Day 18–19 : Unit Testing in Flutter using ‘ mockito’
- 60 Days of Flutter : Day 20–21 : Unit Testing a Bloc in Flutter
- 60 Days of Flutter : Day 22–23 : Building a Modern Contacts Page in Flutter
- 60 Days of Flutter : Day 24–26 : Building a Animated Progress Fab and the Contacts Bloc in Flutter
- 60 Days of Flutter : Day 27–29 : Sending and Retrieving Messages from Firebase using BLOC
- 60 Days of Flutter : Day 30–32 : Firebase Chat UI using Stream and Bloc
- 60 Days of Flutter : Day 33–35 : Paginating data from Firestore using Firebase Queries
- 60 Days of Flutter : Day 36–38 : Seamlessly Upload Files to Firebase Storage
- 60 Days of Flutter : Day 39–41 : One UI Inspired Attachments Showcase Page
- 60 Days of Flutter : Day 42–45 : Creating the Home Page & Quick Peek BottomSheet for Messages
- 60 Days of Flutter : Day 45–47 : Adding Dark Mode to a Flutter App
- 60 Days of Flutter : Day 48–50 : Creating the Settings Page using Bloc
- 60 Days of Flutter : Day 51–54 : Unit Testing Firebase Providers with Mockito
- 60 Days of Flutter : Day 55–56 : Deploying Firestore Security Rules using Firebase CLI
- 60 Days of Flutter : Day 60 : Wrapping It Up
Show Your Support
Press the clap button below if you liked reading this post. The more you clap the more it motivates me to write better!