60 Days of Flutter : Day 6–7 : Implementing a Slideable Widget Using Bottomsheet in Flutter
In last post we touched upon Widget Testing with Flutter. Today we will build a page which will list all the conversations. This Page/Widget essentially, will slide up from the bottom when you swipe up on the InputWidget.
The Decison
I took a look at different widgets from the flutter framework and also few libraries for this task. I could’ve probably moved on and talked directly about the one I used but I thought it’s worth mentioning few of the really good libraries/widgets I took a look at. Here are the links:
- Rubber by Mattia Crovero
- Sliding_up_panel by Akshath Jain
And in the end this excellent post by Joe Birch made me choose Persistent Bottomsheets for the page I was trying to build.
Let’s Get Started

First things first, Let’s add Gesture Detection to our InputWidget . We’d want the Persistent BottomSheet to be displayed on swiping up on the InputWidget. We’ll achieve this by using the GestureDetector Widget.
- The gesture detector returns the details of the user’s gesture direction in the
onPanUpdateMethod. delta.dy > 0would mean that the user swiped up anddelta.dy < 0would mean that the user swiped down.- Similarly,
delta.dxcan be used for detecting left and right gestures on any widget.
The BottomSheet
There are two types of BottomSheets, Persistent and Modal. Details of these have been explained in the post I linked in the intro section above. For our use case we’ll be using a Persistent Sheet. Quoting from Joe Birch’s post:
When a persistent bottom sheet is displayed, it is usually shown to compliment the current content of the application. These sheets can be used to display context aware content and will remain in place whilst the user is navigating around.

This is what we’ll have for the content of the BottomSheet. Let’s start by creating the ConversationBottomSheet Widget:
Explaining the code above, First up we’re creating a Scaffold to hold our Content. We’ll have vertically flowing content in form of a NavigationPill, A Heading and the Chat rows.
Ideally, We’d have achieved this by nesting a NavigationPill , a Text and a ListView in a column, but nesting ListView inside Column doesn’t work inside a BottomSheet because Flutter isn’t able to layout the content.
So, we’re using a ListView nested inside a ListView.Do note that nesting ListView inside another ListView will need us to add these properties to the children for the scroll to work properly.
shrinkWrap: true,
physics: ClampingScrollPhysics()
NavigationPill is a basic custom widget (The rectangle with rounded edges you see at the top). Here’s how I built it:
Nothing too fancy, Actually.

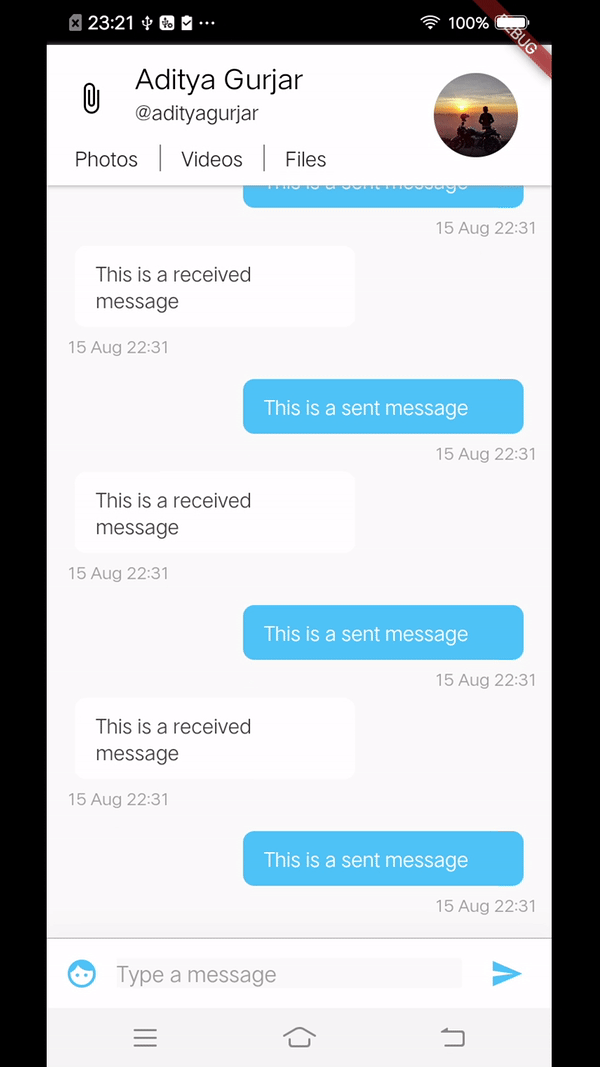
The ChatList
Let’s go ahead and build the rows for the ChatList.
We have again used the Expanded Widget like we did for the AppBar we built in one of the earlier posts. This time we’re using it to divide the Row Widget into two sections of 8:2 width. We have the profile picture, name and message preview in the first section and date in the second section.
Showing The BottomSheet
In order for a Persistent BottomSheet to be displayed we need to provide it with a Scaffold instance. Create a global instance of Scaffold key in the ConversationPage class.
final GlobalKey<ScaffoldState> _scaffoldKey = new
        GlobalKey<ScaffoldState>()
Now we need to set this key to our Scaffold and then use it to display the modal sheet.
After all this we should have a working bottomsheet like this:
The Problems !
The Bottomsheet we built sure as hell looks cool. But there are few problems:
- You cannot swipe down to dismiss the sheet.
- We need to extract out the
InputWidgetfrom theConversationPageWidget to the outerConversationPageSlideWidget. This is to make sure that multiple instances aren’t created. - We need to hide/shadow the top toolbar from the current active chat.
We’ll go ahead and do all these fixes in tomorrow’s post.
Code Changes
#6 Added Bottomsheet with ChatList
How Can You Contribute?
- Open issues with suggestion of better approaches or ideas for the app.
- Connect with me on Twitter or Linkedin or Instagram.
- Star the Github repository.
- Share the series on Twitter.
- Follow me on Github.
Posts In This Series
- 60 Days Of Flutter : Building a Messenger from Scratch
- 60 Days of Flutter : Day 1 : Creating the App
- 60 Days of Flutter : Day 2 : Setting Up A CI With Flutter
- 60 Days of Flutter : Day 3–4 : Building a Chat Screen in Flutter
- 60 Days of Flutter : Day 4–5 : Widget Testing With Flutter
- 60 Days of Flutter : Day 6–7 : Implementing a Slideable Widget Using Bottomsheet in Flutter
- 60 Days of Flutter : Day 8 : Changing The Launcher Icon and Implementing GestureDetector
- 60 Days of Flutter : Day 9–10–11 : Creating Awesome Register Screen in Flutter
- 60 Days of Flutter : Day 12–14 : Understanding BLoC Pattern in Flutter
- 60 Days of Flutter : Day 15–17 : Implementing Registration Screen using ‘flutter_bloc’
- 60 Days of Flutter : Day 18–19 : Unit Testing in Flutter using ‘ mockito’
- 60 Days of Flutter : Day 20–21 : Unit Testing a Bloc in Flutter
- 60 Days of Flutter : Day 22–23 : Building a Modern Contacts Page in Flutter
- 60 Days of Flutter : Day 24–26 : Building a Animated Progress Fab and the Contacts Bloc in Flutter
- 60 Days of Flutter : Day 27–29 : Sending and Retrieving Messages from Firebase using BLOC
- 60 Days of Flutter : Day 30–32 : Firebase Chat UI using Stream and Bloc
- 60 Days of Flutter : Day 33–35 : Paginating data from Firestore using Firebase Queries
- 60 Days of Flutter : Day 36–38 : Seamlessly Upload Files to Firebase Storage
- 60 Days of Flutter : Day 39–41 : One UI Inspired Attachments Showcase Page
- 60 Days of Flutter : Day 42–45 : Creating the Home Page & Quick Peek BottomSheet for Messages
- 60 Days of Flutter : Day 45–47 : Adding Dark Mode to a Flutter App
- 60 Days of Flutter : Day 48–50 : Creating the Settings Page using Bloc
- 60 Days of Flutter : Day 51–54 : Unit Testing Firebase Providers with Mockito
- 60 Days of Flutter : Day 55–56 : Deploying Firestore Security Rules using Firebase CLI
- 60 Days of Flutter : Day 60 : Wrapping It Up
Show Your Support
Press the clap button below if you liked reading this post. The more you clap the more it motivates me to write better!